Creating a Form
Ektron provides sample forms to start with and then customize. Forms are saved to a database by default, but not emailed. To change either setting, use the Edit Properties screen.
You can create HTML forms only in a folder whose template uses a FormBlock or Poll server control. For example, the Company folder uses the template company.pb.aspx.
 Show me.
You can modify this template as needed or create your own form template and assign it to any folder through its Folder Properties screen. Because folders inherit properties from their parent folder by default, new folders created under a parent folder use the correct template. Of course, you can break inheritance and assign a custom template for any folder.Consult with your Ektron administrator about the folders in which you should create forms.
NOTE: You can also create a new edition of a form in another language by copying an existing form and translating it. For more information, see Translating Content to Another Language.
- From the View menu, click Language, and select the language in which to create the form.
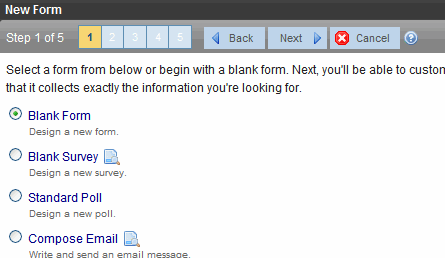
- Click New menu > HTML Form/Survey. The New Form screen appears.
- Choose the form that you want to begin with. You can click preview (
 ) next to any sample form to see it before choosing it. Select a sample that most closely matches the form you want to create. After you create it, you can add fields, remove fields, modify possible responses, etc.
 - Click Next.
- Enter or edit the form’s Title and Description.
- Title—used to reference the form within the Workarea (required)
- Description—an extended description of the form
- The next screen lets you assign a task to a user or user group. If you do, a task will be created every time a site visitor submits this form. See Also: Assigning a Task to a Form
- A new screen lets you determine what happens after the site visitor completes the form. The choices are:
- Display a message—See Choosing a Format to Display Form Data
WARNING! If your form/survey/poll uses either Redirect option, your Web developer must use a FormBlock server control to display this form on a Web page. He cannot use a Poll Server Control when redirecting to an action page.
Redirect to a file or page—Identify a file or a page on your Web site that is launched when the visitor completes the form. An example of a file is a white paper (a common file format is .PDF) that a visitor requested.An example of a page is one that prompts the visitor to download your product.
- Redirect to form data to an action page—See Redirecting Form Data to an Action Page
- Report on the form—See Letting Site Users See the Form Results
- Display a message—See Choosing a Format to Display Form Data
- When you have completed information about the form, you can enter the form’s content.
Creating a Form’s Content
Here is an example of form content that you can create.

Note that some fields are required, and some provide a dropdown list of choices. You can learn how to create such a form by following the directions below.
The final screen of the Forms setup lets you arrange a form that collects the information you want. To create the form, insert fields that prompt a site visitor to enter information. Then, add a button that enables the user to submit data.
NOTE: In addition to inserting fields, you can add explanatory text, lines, images, etc. to the form. To lay out fields in columns, insert a table and place the fields within table cells.
|
Button |
Inserts this kind of field |
Description |
For more information, see |
|
|
Checkbox |
User’s response is either checked or unchecked |
|
|
|
Text |
Free text field; user cannot format text |
|
|
|
Choices |
Several choices appear on screen. User checks any number of appropriate responses. |
|
|
|
Calendar |
Lets user insert a date by clicking a calendar |
|
|
|
Insert Button |
Button with no text. You can easily add text to it. When a site visitor completing the form presses this button, the data on the screen is submitted to your Web server. |
|
|
|
Insert Reset |
Button with Reset as its text. When a site visitor completing the form presses this button, the form’s field values are set to their state when the form first loaded. |
|
|
|
Insert Submit |
Button with Submit as its text.When a site visitor completing the form presses this button, the data on this screen is submitted to your Web server. |


Next, click Save and Submit or Publish ( ). The form only appears on your Web site after it is published.
After you complete and save the form, it may need to go through the approval process. When that is complete, add it to the site by assigning it to a page template.
Inserting a Checkbox Field
A Checkbox field is one character wide and accepts one of two possible values: checked or unchecked. For example

To insert a checkbox field, follow these steps.
- Place the cursor where you want the check box field to appear.
- Click the Checkbox field button (
 ). The following dialog appears.
Field
Description
Descriptive Name
Enter a descriptive name for this checkbox.
Field Name
Enter a name for this checkbox. This text identifies the field in the database and in email (if the form is mailed).
NOTE: You cannot enter spaces nor most special characters (!@#$%^&*()+=<>,.:;’"{}[]|‘~) into this field. If you do, they are replaced by underscores.
Tool Tip Text
Enter text that appears when a site visitor hovers the cursor over this field (circled in red below).

Default value
If you want this field to be checked when the screen first appears, click True. Otherwise, click False.
A site visitor can change the default value while completing the screen.
Caption
Enter text to guide the user’s response to this field. The caption appears on the screen to the right of the checkbox.
To continue the above example, the caption would be Check if you are over 65.
Inserting a Choices Field
Use a Choices field when you want a site visitor to select from a predetermined list. You can allow a site visitor to select only one or more than one choice. You can also determine the list’s items and appearance.
To insert a choices field:
- Enter a field label. For example, Country.
- Click Choices (
 ). The following dialog appears.
Field
Description
Descriptive Name
Enter a description of the field. This text describes the field on form reports.
Field Name
Enter a name for this field. This text identifies the field in the database and in email if the form is mailed.
NOTE: You cannot enter spaces nor most special characters (!@#$%^&*()+=<>,.:;’"{}[]|‘~) into this field. If you do, they are replaced by underscores.
Tool Tip Text
Enter text that appears when a site visitor hovers the cursor over this field (circled in red below).
List
- Custom—You create your own set of choices. Use the Item List area to do this. See Also: Item List
- Languages—A standard list of languages
- Countries—A standard list of countries
- U.S States and Territories—A standard list of United States of America states and territories
- Canadian Provinces—A standard list of Canadian provinces
- Age Ranges—A standard list of age ranges
- Numeric Ranges—A standard list of numeric ranges
- Years—A standard list of years
- Gender—Male or female
- Marital Status—A standard list marital statuses
Allow Selection
Click More than one to let a site visitor select more than one item for this field. Otherwise, click Only one to limit the user to one choice.
A selection is required—Check this box if the user must select at least one item.
First item is not a valid selection—You can use the first list item to prompt the user to make a selection instead of being a valid response. For example, the first item may say Select from the list. To do so, check this box. If you do, the site visitor must choose any selection except the first item. If he tries to file the screen without choosing a different item, this error message appears: First item is not a valid selection.
NOTE: This option is only available if Appearance is set to Drop List.
Appearance
Option Example Vertical List—arranges choices vertically 
Horizontal List—arranges the choices horizontally 
List Box—displays all choices in a box. If more than four choices are available, the user scrolls to see additional options. 
Drop List—displays all choices in a dropdown list. When the user clicks the down arrow, all entries appear. 
This section of the screen displays the list items. It is only editable if the list type is Custom.
The Context-Sensitive Menu
Buttons to the left of each item (circled below) display a menu. The menu lets you remove items, rearrange them, and insert additional items anywhere on the list.

The Selected Box
Place a check in the box of any item to be checked by default on the data entry screen. If you do, the user can accept the default or uncheck the item by clicking in the checkbox. Note that if Only One is selected under Allow selection (above), only one item can be selected. If the Appearance is set to Drop-Down list, this value is ignored.
Display Text
Enter text to describe this item on the data entry screen.
Value
Enter the value that is collected when the site visitor selects this item. For example, if Interests appears in the Name field, and you want music to be collected when the data entry user selects this item and saves the page, enter music here.
The Disabled Checkbox
Check the box next to any selection that you want to disable. If you do, the option appears on the form but the user cannot select it.
Option
Click this button to add a row to the bottom of the list.
Inserting a Calendar Field
To insert a field that lets a site visitor select a date, use a Calendar Field. To do that, follow these steps.
- Enter a field label. For example, Expiration Date.
- Click Calendar field (
 ). The following dialog appears.

|
Field |
Description |
|
Descriptive Name |
Enter a description of the field. This text describes the field on form reports. |
|
Field Name |
Enter a name for this field. This text identifies the field in the database and in email if the form is mailed. NOTE: You cannot enter spaces nor most special characters (!@#$%^&*()+=<>,.:;’"{}[]|‘~) into this field. If you do, they are replaced by underscores. |
|
Tool Tip Text |
Enter text that appears when a site visitor hovers the cursor over this field (circled in red below).
|
|
Default value |
If you want to set a default date, enter it here. The site visitor can change the default value while completing the screen. |
|
Validation |
Select the kind of validation to apply to this field. The choices are:
|
|
Error Message |
Enter text that appears if a site visitor‘s response does not satisfy the validation criterion. For example, if the validation criterion is Cannot be blank, the error message could be Please enter a response. By default, the error message is the same as the validation criterion. Use this field to customize its text. NOTE: You can only enter double-byte characters if your Windows settings include that language. If you enter characters that are not in a language defined in your Windows settings, question marks (?) appear instead of the characters. |
|
Field |
Description |
|
Descriptive Name |
Enter a description of the field. This text describes the field on form reports. |
|
Validation |
Select the kind of validation to apply to this field. The choices are:
|
|
Message |
Enter text that appears on the screen if the site visitor‘s response does not satisfy the validation criterion. For example, if the validation criterion is Cannot be blank, the error message could be Please enter a response. By default, the error message is the same as the validation criterion. Use this field to customize it. NOTE: You can only enter double-byte characters if your Windows settings include that language. If you enter characters that are not in a language defined in your Windows settings, question marks (?) appear instead of the characters. |
|
Field |
Description |
|
Validation |
Select the kind of validation to apply to this field. See Validation OptionsYour system administrator determines whether a user can save an invalid document. |
|
Message |
Enter text that appears on the screen if a site visitor‘s response violates the validation criterion. For example, if the validation criterion is telephone number, the error message could be Please enter 7 or 10 digits. It would appear if the user entered, for example, S061882. By default, the error message matches the selected validation criterion. Use this field to customize the text. NOTE: You can only enter double-byte characters if your Windows settings include that language. If you enter characters that are not in a language defined in your Windows settings, question marks (?) appear instead of the characters. |
|
Custom Validation |
See Custom Validation. |
Inserting a Text Field
Use a text field when you want the user to enter a free text response, or to display text on the screen. There are many variations you can apply to such a field, such as
- a default value
- text can be read-only or hidden
- the field can expand to accommodate user input
- validation, requiring user input to meet criteria such as a non-negative whole number or a zip code
To insert a text field, follow these steps.
- Enter a field label. For example, Name.
- Place the cursor where you want the text field to appear.
- Click Text field (
 ). The following dialog appears.

NOTE: If you are using FireFox, you cannot enter text into a text field while creating or editing the form. If you need to prefill a text field with text, use the field’s Default Value property.
|
Field |
Description |
|
Descriptive Name |
Enter a description of the field. This text describes the field on form reports. |
|
Field Name |
Enter a name for this field. This text identifies the field in the database and in email if the form is mailed. NOTE: You cannot enter spaces nor most special characters (!@#$%^&*()+=<>,.:;’"{}[]|‘~) into this field. If you do, they are replaced by underscores. |
|
Tool Tip Text |
Enter text that appears if a site visitor hovers the cursor over this field (circled in red below).
|
|
Default value |
If you want to set a default value for this field, enter it here. For example, if this field collects a city, and most users enter New York, enter New York as the value. A site visitor can change the default value while completing the screen. |
|
Allow multiple lines |
Check this box if you want this field to scroll vertically to allow the person completing the form to enter as much text as needed. NOTE: This setting cannot be applied if this is a Password field. |
|
Cannot be changed |
Check this box to prevent the person completing this field from changing its content. For example, you want to display a license agreement. Below this field, you might place a check box prompting the site visitor to check it to indicate he has read the agreement. As another example, you could provide instructions for completing the screen. |
|
Invisible |
Check to make this field hidden. This option lets you store unseen information in each document. An example might be putting a version number on the form. f you apply this property to a form, the Allow multiple lines and Cannot be changed fields are automatically checked and cannot be unchecked. Also, the Validation tab is disabled. |
|
Password field |
Use a password field when you want the user to enter a password. A password is like a text field but the user’s entry is disguised. This prevents an onlooker from seeing the password. Passwords cannot exceed 18 characters.
|


|
Field |
Description |
|
Validation |
Select the kind of validation to apply to this field. See Validation OptionsYour system administrator determines whether a user can save an invalid document. |
|
Message |
Enter text that appears on the screen if a site visitor‘s response violates the validation criterion. For example, if the validation criterion is telephone number, the error message could be Please enter 7 or 10 digits. It would appear if the user entered, for example, S061882. By default, the error message matches the selected validation criterion. Use this field to customize the text. NOTE: You can only enter double-byte characters if your Windows settings include that language. If you enter characters that are not in a language defined in your Windows settings, question marks (?) appear instead of the characters. |
|
Custom Validation |
See Custom Validation. |
Validation Options
NOTE: Your Web developer can customize validation options. For details, see Customizing Validation. However, the file that maintains custom validation is different for HTML forms: it is siteroot/workarea/ContentDesigner/ValidateSpace.xml.
|
Option |
Characteristics of Valid Response |
Used with text field |
Used with calendar field |
|
No validation |
Response is not checked. |
|
|
|
Cannot be blank |
Response is required. The format of the response is not checked. |
|
|
|
Allow Maximum of 1000 characters |
Response cannot exceed 1000 characters. (Only available if text field is set to Allow Multiple lines.)
|
|
|
|
Minimum of 8 characters with at least one digit |
Site visitor’s entry must be at least 8 characters and include one digit. (Only available if text field is set to Password field.) |
|
|
|
Non-negative whole number or blank |
A positive whole number or no response. |
|
|
|
Non-negative whole number (required) |
|
|
|
|
Decimal number or blank |
A decimal number (for example, 12.345 or 12) or blank. A leading minus sign “-” is allowed. The decimal point must be a period (.), even in locales that normally use a comma (,). NOTE: Decimal numbers include whole numbers because the decimal point is implied. That is, 12 is 12.0000. |
|
|
|
Decimal number required |
A decimal number (it cannot be blank) of none, one, or two decimal places. A leading minus sign “-” is allowed. The decimal point must be period (.), even in locales that normally use a comma (,). NOTE: Decimal numbers include whole numbers because the decimal point is implied. That is, 12 is 12.0000. |
|
|
|
Percent: (0-100) required |
A whole number from 0 to 100. A response is required. |
|
|
|
email address |
a@a, where a is one or more characters. |
|
|
|
email address required |
a@a, where a is one or more characters. A response is required. |
|
|
|
email address list |
Several email addresses. Each address’s format is a@a, where a is one or more characters. The user must separate each address with a semicolon (;). |
|
|
|
email address list required |
Several email addresses. Each address’s format is a@a, where a is one or more characters. The user must separate each address with a semicolon (;). A response is required. |
|
|
|
Zip code (US) |
5 (nnnnn) or 9 digits. If 9, a dash appears after the fifth (nnnnn-nnnn). |
|
|
|
Zip code (US) required |
5 (nnnnn) or 9 digits. If 9, a dash appears after the fifth (nnnnn-nnnn). A response is required. |
|
|
|
Social Security (US) |
Nine digits in this pattern: nnn-nn-nnnn. |
|
|
|
Social Security (US) required |
Nine digits in this pattern: nnn-nn-nnnn. A response is required. |
|
|
|
Postal Code (Canada) |
ana nan, where a is an alphabetic character and n is numeric. |
|
|
|
Postal Code (Canada) - (required) |
ana nan, where a is an alphabetic character and n is numeric. A response is required. |
|
|
|
Social Insurance Number (Canada) |
A nine digit number in the format: nnnnnnnnn. |
|
|
|
Social Insurance Number (Canada) Required |
A nine digit number in the format: nnnnnnnnn. A response is required. |
|
|
|
Telephone number (US and Canada) |
A seven or 10 digit number in the format nnnnnnn or nnnnnnnnnn. The site visitor can insert separator characters, such as dashes (-), between numbers. |
|
|
|
Telephone number (US and Canada) (required) |
A seven or 10 digit number in the format nnnnnnn or nnnnnnnnnn. The site visitor can insert separator characters, such as dashes (-), between numbers. A response is required. |
|
|
|
URL |
A Web site address. |
|
|
|
ISBN |
The International Standard Book Number (ISBN) is a 10 or 13-digit number that uniquely identifies books and book-like products published internationally. When printed, the ISBN number is preceded by the letters ISBN. (Copied from www.isbn.org.) |
|
|
|
ISSN |
The ISSN (International Standard Serial Number) is an eight-digit number which identifies periodical publications as such, including electronic serials. The ISSN takes the form of the acronym ISSN followed by two groups of four digits, separated by a hyphen. The eighth character is a control digit calculated according to a modulo 11 algorithm on the basis of the 7 preceding digits; this eighth control character may be an “X” if the result of the computing is equal to “10”, in order to avoid ambiguity. (Copied from www.issn.org.) |
|
|

Custom Validation
The Text and Calendar field dialog’s Validation tab features a validation area.

The validation feature can ensure the following aspects user input.
- The data type—the default types are
- text
- URL
- whole number
- decimal number
- floating point number (Floating point includes scientific notation, so is appropriate for scientific numbers. Decimals usually suffice for business numbers.)
- date (calendars only)
- The field value has one of the following relationships with another field, a number, or an expression. The default expressions are
- between two values (either another field or a number that you specify)
- less than
- equal to
- not equal to
- maximum length (usually for text responses)
NOTE: Your Web developer can customize validation options. For details, see Customizing Validation. However, the file that maintains custom validation is different for HTML forms: it is siteroot/workarea/ContentDesigner/ValidateSpace.xml.
Your system administrator determines if a user can save the invalid data.
When the Custom Validation option is selected from the Validation field, the Custom Validation screen area becomes active.

- The Data Type field is the value’s basic type, for example, text, number, or URL.
- The Condition field displays the validation logic.
- The Examples drop-down list shows validation expressions that you can apply to the field.
Example of Creating Custom Validation
As an example of custom validation, assume that a field collects telephone numbers, and you want to make sure the user enters 10 digits. To accomplish this, follow these steps.
- Insert a Text Field.
- Complete the Text Field dialog’s General tab.
- Click the Validation tab.
- In the Validation dropdown list, select (Custom).
- In the Data Type field, select Whole Number from the drop down list. This ensures that the user can only enter digits.
- Click the down arrow to the right of the Examples field to see sample logic.
- Click Maximum text length... . This option lets you specify the length of the user’s response.
- string-length(.) <= {X} appears in the Condition field.
- Since you want the user’s input to equal 10, remove the less than sign (<) from the calculation. Now it looks like this: string-length(.) = {X}.
- Replace the {X} with 10. Now, it looks like this: string-length(.) = 10.
- Move the cursor up to the Message field and compose a relevant error message. For example: must be 10 digits.
- Press OK.


Click the Data Style tab to apply formatting to a field that accepts user input. When you do, the following tab appears.

Use the tab to assign the following formatting attributes to a response field.
- Font style and size
- Bold and italic
- Text alignment (especially helpful for formatting dollar amounts in a plain text field)
- Underline or strikethrough
- Font color and/or background color
Inserting Buttons
A form typically includes one or more buttons, which let a site visitor submit a completed form.

eWebEdit400’s form toolbar has three buttons that you can place on a form (circled below.) The buttons are described below.

|
Toolbar Button |
Name |
Description |
|
|
Insert |
Submits form information to your Web server. By default, it has no text. To learn how to add button text, see Editing a Button’s Properties. |
|
|
Reset |
Changes a form’s field values back to their state when the form first loaded. |
|
|
Submit |
Submits form information to your Web server. Its default text is Submit. |
Editing a Button’s Properties
After you insert a button, you may want to enter or change its properties, such as its text, height, and width. To edit a button’s properties, follow these steps.
- Click the button so that it is selected. A selected button is surrounded by small squares, as shown below. Below the editor screen, several fields appear.
- Update the button fields as needed.
- Name—Give the button a unique name.
- Id—If needed, give the button a unique ID.
- Width—Enter or change the button’s width in pixels.
- Height—Enter or change the button’s height in pixels.
- Value—Enter or change the button text.
- Tooltip—Enter or change the button’s tooltip (that is, text that appears in a small window when someone hovers the mouse over the button).
- Classname—Enter or change the style sheet class assigned to the button.

Viewing Form Properties
After a form is created, you can view its information in the Forms folder. To view a form, follow these steps.
- Access the folder that contains the form you want to view.
- Click the form you want to view. The View Form screen displays.
- Click the Form Properties tab.
- Form Title—Title used to reference the form.
- FormID—ID number automatically assigned to form.
- Status—The form’s current status.
- Description—Extended description for the form.
- Form Data—The type of form data: Mail or Database.
- Form Submissions—The maximum number of times a user can submit the form. This is typically used with polls and surveys to limit one user’s influence over the results.
- Assign Task to—Users and groups to whom a task will be automatically assigned whenever a site visitor completes the form.
- Content Properties—Displays the properties of the form’s content.
- Content Title—Title of content associated with form.
NOTE: The content name is the same as the Form name.
- Content ID—Content ID number assigned to content.
- Status—The status of the content.
- Last Editor—Last user to edit the content.
- Start Date—Date and time when content will go live on Web site (if set for future date).
- End Date—Date and time when content will be removed from Web site (if set for future date).
- Action on End Date—What happens to a form when its end date is reached.
- Date Created—Date and time when content was created.
Editing a Form’s Properties
To update additional form information that does not appear on the View Form screen, navigate to the form’s View Form screen and click Form Properties ( ). The Form Properties screen displays a subset of form information.
- Title and Description
- Database or Mail—if form data is emailed whenever a site visitor submits it, enter mail property information.
- Autofill form values—checked by default, this allows the form’s fields to fill automatically when a logged-in site visitor has previously completed the form.
- Limit Submission—when checked, you can enter the number of times a user can submit a form in the Number of Submissions text field
- Assign task to users and groups to whom a task will be automatically assigned whenever a site visitor completes the form.
- Form block’s ID number
- Mail properties
- To—Email address to which the form is sent when submitted.
- From—Text that appears in the email’s From field.
- CC—Text that appears in the email’s CC field.
- Subject—Text that appears in the email’s subject field.
- Preamble—Beginning text of the email.
- Send data in XML Format—A green check means email data will be in a structured XML packet. A red X means the email data will be in a standard mailto format. For more information, see Submitted Data as XML.
Retrieving an email Address from a Submitted Form
In the Mail Properties section of the Edit Form screen, you can select email addresses submitted on the form to be inserted into the To, From, and CC Mail Property fields. Instead of entering a static email address, it can be dynamically retrieved from the user’s form submission. For example, you want to retrieve the “from” field of an email from the information a user enters when completing the form. To do this, use the OR to addresses in field dropdown lists shown below. These lists contain fields that dynamically retrieve data from the submitted form.

Note that the To and CC fields can accept fields whose validation type is email address or email address list. On the other hand, the From field can only accept fields whose validation type is email address (that is, a single email address).
To set up email address retrieval:
- Add a form field whose Validation type is Email address or Email address list . The field prompts the user completing the form to enter his email address. Label the field something like Enter your email address. If the field allows more than one address, add on-screen instructions to separate each address with a semicolon (;).

- Go to the Edit Form screen > Mail Properties section.
- Move to the field labeled From:.
- At the dropdown list following OR to addresses in field, select the field you created in Step 1.
When a user completes the form, the value entered in the field created in Step 1 is used for the email’s From address.
Retrieving Form Data Into the Subject and Preamble Fields
You can retrieve data from a submitted form directly to the form’s Subject and Preamble fields. (The subject is a standard mail field, and the preamble is text that appears at the beginning of the email.)
For example, the form may provide a list of your products. While the user is completing the form, he selects a product that he is interested in. The product then becomes the subject line of the email.
NOTE: Since a Textarea field can span multiple lines, it can only be used with the preamble. However, a plain text field can be used with both the subject and preamble.
To retrieve data dynamically from a form field into the email’s subject line or preamble, follow these steps.
- Add a form field that collects the information you want to insert into the email’s subject line or preamble.
- Go to the Edit Form screen > Mail Properties section.
- Move to the field labeled Subject or Preamble.
- At the dropdown list following OR use text in field, select the field you created in Step 1.